
Main Courses
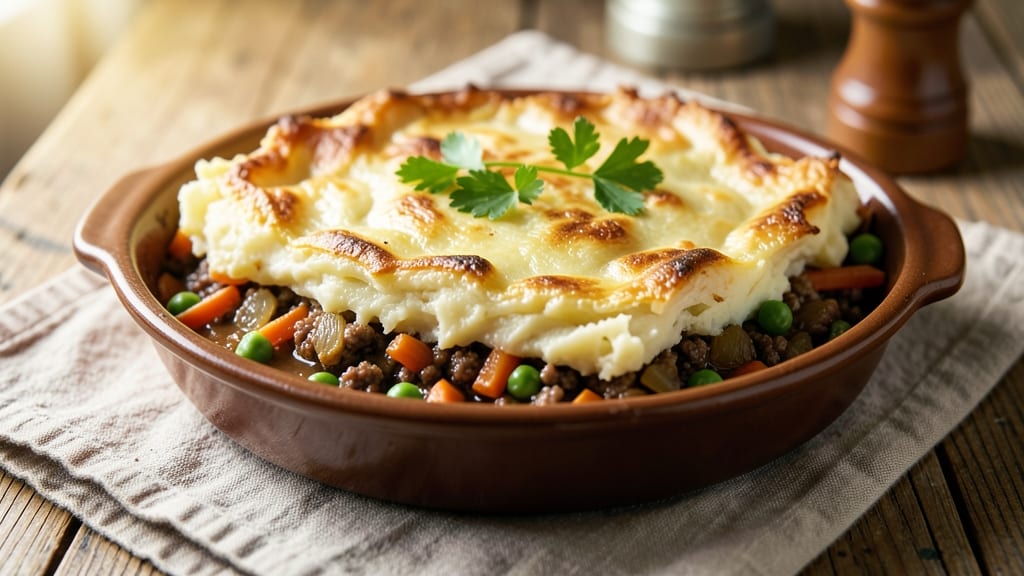
This beef and potato shepherd's pie recipe delivers everything you love about comfort food—tender beef, rich gravy, and a golden, crispy potato topping that seals in all the savory goodness. 🔥 The secret lies in slow-cooked ground beef with carrots and peas, perfectly balanced by a velvety mashed potato crust that bakes to a satisfying crunch.
I've perfected this version to ensure the filling stays moist while the topping achieves that coveted crispy texture without sacrificing creaminess.
The beauty of this dish is in its simplicity: one-pot preparation makes it ideal for weeknight dinners, while the layered technique ensures each bite delivers the perfect harmony of textures.
Browning the beef first develops deep, caramelized flavors, and the potato topping is whipped just enough to create that signature rustic finish. No one will guess it's made from basic pantry staples—just restaurant-quality comfort food.
What makes this shepherd's pie truly special is how it transforms humble ingredients into a showstopping meal. The beef filling simmers until tender, absorbing the flavors of onions, garlic, and Worcestershire sauce, while the potato topping achieves that crispy edge and creamy interior.
The result? A dish that's hearty enough for a family dinner but elegant enough for company, with every forkful packed with savory depth and satisfying texture.
Ready in about 1 hour, this recipe requires minimal effort but maximum flavor—perfect for meal preppers or anyone craving a no-fuss dinner that feels like a hug. The best part? Leftovers reheat beautifully, making it a weeknight staple. Let's get cooking!
Ingredients for beef and potato shepherd's pie
Pantry staples meet restaurant-quality comfort—just 15 ingredients for a dish that feels like a hug.
| Ingredient | Amount | Notes |
|---|---|---|
| Ground Beef (80/20) 🥩 | 1 ½ lb | Lean but flavorful, pre-browned for depth |
| Yellow Onions 🧅 | 1 ½ cups | Diced small, sweet or yellow preferred |
| Garlic Cloves 🧄 | 4 cloves | Minced fine for even distribution |
| Carrots 🥕 | 1 cup | Diced small, baby carrots work perfectly |
| Frozen Peas 🌱 | 1 cup | Thawed before adding to filling |
| Beef Broth 💧 | 1 ½ cups | Low-sodium preferred for flavor control |
| Worcestershire Sauce 🍶 | 1 tbsp | Essential for umami depth |
| Tomato Paste 🍅 | 2 tbsp | Squeeze tube preferred for convenience |
| All-Purpose Flour 🌾 | 2 tbsp | For thickening gravy |
| Russet Potatoes 🥔 | 2 ½ lb | Starchy variety for best mash |
| Unsalted Butter 🧈 | ½ cup | Cold, cut into small cubes |
| Whole Milk 🥛 | ½ cup | Full-fat for creamy texture |
| Salt 🧂 | 1 ½ tsp | Diamond Crystal preferred |
| Black Pepper 🌶️ | ½ tsp | Freshly ground for best flavor |
| Dried Thyme 🌿 | 1 tsp | Or 1 tbsp fresh thyme leaves |
The beef is non-negotiable here. 80/20 ground chuck gives you that perfect balance of flavor and tenderness—leaner cuts won't brown as beautifully. I always grab mine from Costco when possible, but the regular supermarket stuff works fine if it's fresh. Look for bright red color and good marbling. Browning the beef first develops those deep, caramelized flavors that make this dish sing. Pro tip: Don't skip this step—it's what transforms basic ingredients into something extraordinary. The potatoes? Russets are a must—their high starch content makes the mash silky smooth while still crisping up perfectly on top.
No Worcestershire sauce? Soy sauce plus a pinch of sugar gets you close. Fresh thyme is ideal, but dried works at one-third the amount. The tomato paste can be that squeeze tube from Trader Joe's—it's perfect for this recipe since you only need a small amount. For the peas, frozen is fine, but if you've got fresh, use them instead. The beef broth is where flavor builds—low-sodium is key so you can control the seasoning. And if you're worried about the filling being too wet, just simmer it uncovered for a few extra minutes. Trust me, it'll come together perfectly.
This dish reheats beautifully—honestly tastes even better the next day as all those flavors meld together. Store leftovers in an airtight container in the fridge for up to 5 days. For freezing, portion into individual servings first—3 months is the sweet spot. The potato topping is best made fresh, but you can prep the filling ahead and assemble it when you're ready to bake. And if you're making this for a crowd, double the recipe—the extra effort is worth it for those crispy edges and creamy centers.
Why You'll Love This Recipe
- One-Pan Magic: I swear by this for nights when I’m too tired to scrub pots. The ground beef browns in the same pan where the onions caramelize—no extra dishes, just layers of flavor. Honestly, I’ve made it with just a wooden spoon and a lid, and it still comes out rich.
- Fat’s Where It’s At: That 80/20 beef? It’s the secret weapon—juicy, savory, and crispy at the edges. The onions and garlic slow-cook into the meat, while the peas add a bright pop that cuts through the richness. (Yes, even on a Tuesday night.)
- Leftovers That Beg for More: This dish tastes better the next day—crispy top, tender filling, no sad soggy bits. I double the batch and freeze half; reheating it in the oven brings it back to life like it’s fresh. My kids pretend they’re not eating leftovers.
- Budget Meal, Big Payoff: Ground beef, onions, and frozen peas? Check. Carrots? Check. It’s the kind of meal that stretches a few dollars without feeling cheap. I’ll be real: the first time I made it, I thought, “This is fancy for $12.” (It is.)
Step-by-step instructions for beef and potato shepherd's pie
Here's how to create a restaurant-worthy shepherd's pie with a golden crust, savory filling, and velvety mash.
🍳 Step 1: Brown the Ground Beef for Maximum Flavor
Heat a large skillet over medium-high heat and add the 1.5 lb ground beef (80/20). Break it apart with a wooden spoon as it cooks, letting the fat render naturally. Don't rush this step—you want the beef to brown deeply, which builds rich flavor. After 5-6 minutes, the beef should be dark brown with no pink remaining.
Once browned, transfer the beef to a bowl and set aside. In the same skillet, add 1.5 cups diced yellow onions and cook for 4-5 minutes until softened. Add 4 minced garlic cloves and cook for 30 seconds until fragrant. This aromatic base forms the foundation of your filling.
🥘 Step 2: Build the Savory Filling
Return the browned beef to the skillet and stir in 1 cup diced carrots, 1 cup thawed frozen peas, 1.5 cups beef broth, 1 tbsp Worcestershire sauce, 2 tbsp tomato paste, and 1 tsp dried thyme. Bring to a gentle simmer and cook uncovered for 10 minutes, stirring occasionally, until the liquid reduces slightly and the flavors meld.
Sprinkle 2 tbsp all-purpose flour over the mixture and stir vigorously for 1-2 minutes to thicken the sauce. The filling should coat the back of a spoon with a glossy sheen. Season generously with 1.5 tsp salt and 0.5 tsp black pepper, adjusting to taste. This step ensures your filling has the perfect consistency to support that crispy potato topping.
👨🍳 Step 3: Prepare the Creamy Potato Topping
While the filling simmers, peel and cube the 2.5 lb russet potatoes, cutting them into 1-inch pieces. Place them in a large pot and cover with cold water by 1 inch. Add 1 tsp salt and bring to a boil over high heat. Once boiling, reduce to medium heat and cook for 12-15 minutes until the potatoes are fork-tender but not falling apart.
Drain the potatoes thoroughly, then return them to the pot. Add 0.5 cup cold unsalted butter and 0.5 cup whole milk, mashing until smooth and creamy. You want a texture that's light and fluffy—not gluey. Season with additional salt and pepper if needed. The butter and milk create that luxurious, velvety finish that makes this dish irresistible.
🔥 Step 4: Assemble and Bake to Golden Perfection
Preheat your oven to 400°F. Spread the beef filling evenly in a 9x13-inch baking dish, creating a smooth, level surface. Spoon the mashed potatoes over the top, using the back of a spoon to create textured peaks—this helps them crisp up beautifully. For extra crispiness, I like to brush the top with a little whole milk before baking.
Bake uncovered for 25-30 minutes until the top is deep golden brown and the edges are crispy. The filling should be bubbling hot underneath. For the crispiest crust, broil for 1-2 minutes at the end, watching closely to avoid burning. Let it rest for 5 minutes before serving—this allows the filling to set slightly and makes slicing easier.
🍽️ Step 5: Serve with Confidence
Slice into 6 generous portions and serve immediately. The contrast of the crispy golden crust, creamy mashed potatoes, and rich beef filling is what makes this dish so satisfying. Garnish with fresh parsley if you like, but trust me—the flavors speak for themselves. This shepherd's pie keeps well in the fridge for 3-4 days, making it perfect for meal prep or leftovers that taste even better the next day.
Pro Tips For Making Beef And Potato Shepherd'S Pie
- Brown the Beef Properly: I learned this the hard way—rushing the beef browning means a bland filling. Break the beef into ½-inch chunks, cook in batches in a cold skillet, and let it sear undisturbed for 3-4 minutes until deeply browned. That crust packs serious flavor, and skipping it leaves you with something that tastes more like meatloaf than shepherd’s pie.
- Salt the Onions First: Sounds weird, but it works: Toss your diced onions with ½ teaspoon salt before cooking. This draws out moisture and ensures they caramelize properly instead of steaming into mush. (Yes, even if you’re impatient like me—just give them 5 minutes on medium heat.)
- Don’t Overmix the Potatoes: Mashed potatoes for the topping get gummy when overworked. Use hot potatoes straight from the pot, mash them roughly with a potato masher or ricer, then fold in butter and milk gently—just until combined. A few lumps make the texture better, not worse.
- Add Peas at the End: Frozen peas lose their bright color and turn to mush if cooked too long. Stir them into the beef mixture only in the last 2 minutes of simmering—just enough to heat through. This keeps them vibrant and slightly crisp, not sad and soggy. (Your future self will thank you.)
Serving suggestions for this recipe
Classic Garnish Ideas
Freshly chopped Italian parsley adds a bright pop of color and freshness—sprinkle 1 tbsp over each serving right before digging in. For extra flair, try crispy fried onions (store-bought or homemade) scattered on top—they add a sweet, crunchy contrast that elevates the dish.
I love using Penzeys brand dried parsley for a more intense flavor when fresh isn't available. 🌿
Side Dish Pairings
A simple green salad with a tangy vinaigrette cuts through the richness beautifully. Toss 4 cups mixed greens with 2 tbsp olive oil, 1 tbsp red wine vinegar, and a pinch of Dijon mustard.
For something heartier, serve with crusty bread or garlic bread to soak up any extra gravy. The acidity from the salad balances the richness of the shepherd's pie perfectly.
Beverage Pairings
A robust red wine like Cabernet Sauvignon or Merlot complements the beef flavors beautifully. For a lighter option, try an English bitter ale such as Fuller's ESB—the malty notes enhance the savory filling.
If you prefer non-alcoholic options, a sparkling apple cider with a squeeze of lemon adds a refreshing contrast. 🍷
Presentation Tips
Serve shepherd's pie in individual ramekins for an elegant presentation, especially when entertaining. For a rustic touch, use a wooden board as a serving platter—it adds warmth to the dish. I like to arrange slices in a circular pattern with the crispy potato topping facing outward.
For extra visual appeal, add a drizzle of beef gravy around the edges before serving. The golden crust looks stunning when presented this way!
Make-Ahead Serving
This dish reheats beautifully, making it perfect for meal prep. Store leftovers covered in the fridge for up to 4 days. When reheating, cover with a damp paper towel and warm in a 350°F oven for 15-20 minutes until heated through.
For a crispy top, broil for 2-3 minutes at the end. The flavors actually deepen overnight, making it even more delicious the next day. 💫
Kid-Friendly Serving
For picky eaters, serve shepherd's pie with a side of buttered corn or steamed broccoli to make it more appealing. You can also cut the pie into fun shapes using a cookie cutter for a playful presentation.
I've found that kids love the crispy potato topping—it's like a built-in "crunchy treat" that makes the dish more exciting. Serve with a small bowl of ketchup or honey mustard on the side for dipping fun!
Nutrition facts
Frequently asked questions
Can I make shepherd's pie ahead of time?
This dish actually tastes better the next day as flavors meld. Assemble it completely and refrigerate uncovered for up to 24 hours before baking. For make-ahead baking, cover and refrigerate for 1 day or freeze for 1 month. Thaw overnight in the fridge before baking. The potato topping stays crispy when reheated properly—just cover with foil and warm at 350°F for 20 minutes, then broil for 2 minutes to restore crispiness.
What's the difference between shepherd's pie and cottage pie?
The only difference is the protein! Shepherd's pie traditionally uses ground lamb while cottage pie features ground beef. All other elements—potato topping, gravy, and veggies—are identical. For this recipe, we're making the beef version (cottage pie), but you can swap the meat for lamb if you prefer the classic shepherd's pie flavor. The technique and baking method remain exactly the same.
How do I get the potato topping extra crispy?
For maximum crispiness, whip the mashed potatoes until light and fluffy (not gluey), then spread them in an even layer. Brush the top with whole milk before baking, and bake at 400°F until deeply golden. For restaurant-style crispiness, broil for 1-2 minutes at the end—watch closely to avoid burning! Another pro tip: Use a 9x13-inch baking dish (not round) for better browning. The key is thin, even layers that crisp on top while staying creamy underneath.
Can I substitute the mashed potatoes for something else?
For a low-carb version, try a layer of cauliflower mash or zucchini ribbons> (lightly sautéed with garlic). For extra richness, mix in 1/2 cup shredded cheddar with the potatoes before baking. If you prefer a different texture, you could even use roasted potato slices instead of mash—just arrange them in a single layer on top. The filling will still stay moist as long as you don't over-bake.
Why did my filling get watery?
Watery filling usually happens from one of two issues: either the potatoes released too much moisture (not drained well) or the beef wasn't cooked long enough to thicken the gravy. Fix it by simmering the filling uncovered for 5-10 extra minutes to reduce liquid, or stir in 1 tbsp cornstarch> mixed with water. For next time,